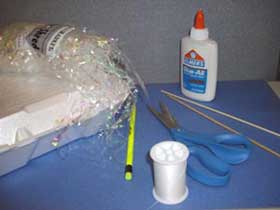
What you need:
How to make the clouds:
Cut out cloud shapes from flat areas of Styrofoam. For clouds that will be "raining," cut two shapes that will be glued together with the Mylar "rain" glued between them.
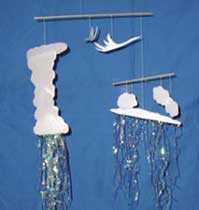
For our mobile, we made a big cumulonimbus cloud. Real cumulonimbus clouds can reach as high as 40,000 feet! Our cumulonimbus reaches from the lowest altitude, which it shares with the rainy nimbostratus cloud, all the way up to the highest, wispiest cirrus clouds. Our cumulonimbus also has multiple layers to make it look more 3-D.
To make "rain," take individual strands of Mylar, fold them in half, and glue onto the cloud, with the strands coming out the cloud bottom.
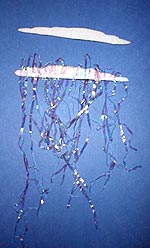
Make Mylar rain come out of your clouds.
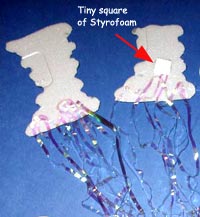
Glue the front and back of the clouds together with a tiny square of Styrofoam between them.
Cut a tiny piece (about ½ inch square) of Styrofoam and glue the two sides of the cloud together with the small piece of Styrofoam between them. This will give your cloud more depth and not squash the Mylar strands as they "rain" out of the cloud. Trim off any Mylar that sticks out from the top of the cloud.
Find the spot on each cloud where it will hang evenly from the thread or string. For some roundish cumulus clouds, it might not matter. But, a long nimbostratus cloud would look odd hanging lop-sided. You can find this exact balance point by poking the threaded needle in where you think it will balance and trying it out. Or, if you don't have a needle, just poke a little hole with the pencil point and put thread through the hole. Keeping poking the thread through in different spots until you find the exact balance point.
Tie one end of the thread securely to the cloud. Leave about 15 inches of thread for tying to the sticks.
To make a mobile like ours, first tie the cumulonimbus cloud to one end of one stick. Tie the thread tightly enough so it won't slip, but not so tightly you can't move it along the stick.
Now, break or cut about three inches off the other stick. Tie the other rain cloud (with Mylar strings coming out of it) to the middle of this shorter stick.
Now tie the two sticks together: To do this, tie the thread to the middle of the short stick and to the end of the long stick opposite the big cumulonimbus cloud. Try to make do it so that the bottoms of the two clouds hang even with each other.
Tie the cirrus clouds to the long (top) stick, even with the top of the cumulonimbus cloud.
Tie the fluffy cumulus clouds to the short (bottom) stick on either side of the nimbostratus.
Now, tie a thread near the center of the long stick and hang the mobile somewhere where it can dance freely in the breeze.
You will probably have to do some adjusting, moving the knots around on the sticks until everything balances nicely.
You can also trim the clouds a bit here and there to make the mobile balanced.
When you have everything balanced just right, put a drop of glue on each knot.
Unlike real clouds, your "mobile clouds" will stick around so you can enjoy them forever!